| Brand | MMOBIEL |
|---|---|
| Model Number | See description |
| Colour | Clear |
| Package Dimensions | 34.79 x 6 x 0.9 cm; 20 g |
| Compatible Models | iMac 21.5" A1418 - Late 2012, Late 2013, Mid 2014, 2015, Retina 4K Late 2015 |
| Special Features | Disposable |
| Item Weight | 20 g |
Image Unavailable
Colour:
-

-
-
- To view this video download
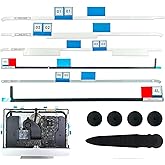
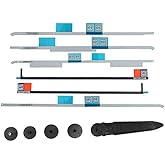
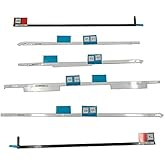
MMOBIEL Replacement LCD Display Adhesive Tape Strips Compatible with iMac 21.5" A1418 - Late 2012, Late 2013, Mid 2014, 2015, Retina 4K End of 2015 - Incl. Cleaning Cloth and Pads
Return this item for free
Free returns are available for the shipping address you chose. For a full refund with no deduction for return shipping, you can return the item for any reason in new and unused condition.
Learn more about free returns.- Go to your orders and start the return
- Select the return method
- Ship it!
Purchase options and add-ons
| Brand | MMOBIEL |
| Colour | Clear |
| Recommended uses for product | Computer |
| Theme | Electronics |
| Cartoon character | iMac / Apple Theme |
| Special feature | Disposable |
| Embellishment | Crystal |
| Age range (description) | Adult |
| Reusability | Single Use |
| Item form | Strip |
|
|
About this item
- Assembling: After the display has been taken off , the display cannot be reinstalled tightly because the Sticker is disposable. A New Set of adhesive Sticker Strips is needed to assemble the Display.
- Easy to use: Incl. Cleaning Alcohol Pads and Cleaning Cloth to help you to gently remove old Adhesive Glue / Dirt.
- Please familiarize yourself with the process before attempting it yourself: We cannot take any responsibility for damage incurred during the replacement process. Please check Model type before you begin the process.
- Assembling: After the display has been taken off , the display cannot be reinstalled tightly because the Sticker is disposable. A New Set of adhesive Sticker Strips is needed to assemble the Display.
- Product provided by MMOBIEL - We always try our best to exceed your expectations at every turn. Join the ever-growing list of satisfied customers and discover the difference with MMOBIEL.
Frequently bought together

Customers who viewed this item also viewed
 Boloest LCD Display Screen Adhesive Strips Sticker Replacement Tape Professional Repair Kit Compatible with Apple iMac 21.5" A1418 Retiona 2012-2015(with Opening Tool)FREE Delivery by ═°Ăě║┌┴¤Get it as soon as Thursday, Jan 30
 MMOBIEL Replacement LCD Adhesive repair Kit strips Compatible with various iMac ModelsFREE Delivery by ═°Ăě║┌┴¤Get it as soon as Thursday, Jan 30
 Irenwarl Adhesive Strip for LCD Display Screen, Adhesive Tape Strip, Replacement Tape Compatible with Apple iMac 27 inch A1419 Retiona 2012-2015 with Tools to Open the LCD Display (Updated Model)FREE Delivery by ═°Ăě║┌┴¤Get it as soon as Thursday, Jan 30Only 14 left in stock (more on the way).
Product Description

- Compatible with: Apple iMac 21.5" A1418 iMac13,1 Late 2012, iMac14,3 Late 2013, iMac14,4 Mid 2014,iMac16,1 2015,iMac16,2 Retina 4K Late 2015
- Easy to use: Incl. Cleaning Alcohol Pads and Cleaning Cloth to help you to gently remove old Adhesive Glue / Dirt.
- Please familarize yourself with the process before attempting it yourself: We cannot take any responsibility for damage incurred during the Replacement process. Please check Model type before you begin the process.
- Assembling: After the display has been taken off , the display cannot be reinstalled tightly because the Sticker is disposable. A new Set of adhesive Sticker Strips is needed to assemble the Display.
- High quality product by MMOBIEL
Removing the display requires cutting through the adhesive around the perimeter of the screen. After the adhesive is cut, it cannot be used to re-seal the display in place, so you'll need to apply a new set of adhesive strips.
Some images in this guide use a 2015 iMac, which has minor visual differences. These differences do not affect the repair procedure.
Step 1
- Before you start placing strips, remove all of the old adhesive around the perimeter of the rear enclosure.
- Peel off the old strips of adhesive using tweezers or your fingers. Start at the bottom and peel upward towards the top of the device.
- After all the old adhesive is removed, carefully clean the area under the adhesive with 90% (or greater) isopropyl alcohol and a lint-free cloth. Wipe in one direction, not back and forth.
Step 2
- Start with the strip labeled 3 (or 03), which goes on the right vertical side of the rear enclosure.
- Before peeling off any backing, line it up against the frame of the iMac to get an idea of where it goes.
- Peel the short piece of backing off the back of the strip.
Step 3
- Insert the tip of a spudger into the hole at the end of the strip from the side that still has a backing on it.
Step 4
- With the spudger still poking through the hole in the adhesive strip, push the spudger tip into the corresponding hole in the frame of the iMac.
- Using the hole and spudger to anchor the position of the adhesive strip, line the strip up against the right edge, gently pulling up against the spudger to ensure the strip is taut, and stick it onto the frame.
Step 5
- Once you've aligned the bottom half of the adhesive strip, peel the longer piece of backing out from behind the strip.
- If the bottom half isn't aligned properly, you can carefully peel it up and re-stick it before peeling off the lower backing strip. Be sure to use the spudger tip to anchor the top.
Step 6
- Align the upper half of the strip with the right edge of the rear enclosure, and stick it down.
Step 7
- Use your finger to smooth Strip 3 along the right edge. Make sure it is neatly aligned with the right side of the frame and that it sits flat.
- Do not peel off the front adhesive backing yet
Step 8
- Work your way around the perimeter of the iMac, adding three more adhesive strips in the same manner.
- Working counter-clockwise from Strip 3
Step 9
- To avoid blocking the microphone port with adhesive, strip 4R must be modified before use. The strip must be shortened and aligned such that the adhesive extends to the right edge of the iMac, but stops short of the microphone port on the left.
- Measure 1.5 inches (38 mm) from the right edge of strip 4R and mark it with a pen.
- Cut the mark with a pair of scissors.
Step 10
- The two remaining strips (4L and 4R) do not have guide holes and are more difficult to place than the previous ones. Before sticking them down, we recommend first setting them in their respective places on the iMac to get comfortable with their placement.
- Grasp the red film pull tab on the 4R adhesive strip and pull to remove the backing from the strip.
- Align the strip on the bottom edge of the rear enclosure such that the strip begins right after the microphone holes. The right end of the strip should terminate at the edge of the frame.
- Run your finger along the length of the adhesive strip to ensure it is straight and unwrinkled, pressing down as you go to adhere the strip to the iMac.
Step 11
- Repeat the previous step for the 4L adhesive strip, placing it along the left half of the bottom edge of the iMac.
- Once you've applied all the adhesive strips, the iMac should look as shown in the photo.
Step 12
- Gently lay the display in place over the iMac, and align it carefully.
- Use painter's tape or masking tape to temporarily secure the bottom edge of the display to the iMac's enclosure.
Step 13
- Insert the display power cable into its socket on the logic board.
Step 14
- Use a pair of tweezers or your other hand to gently insert the display data cable connector into its socket on the logic board.
- Set the display back on the iMac's rear enclosure.
Step 15
- Verify that your iMac is turned off and unplugged from power before you continue.
- After confirming that your iMac functions properly, disconnect the display cables and carefully lean the display forward.
- Remove the film from the 4R strip by reaching in from above and pulling the tab straight up from the bottom edge of the display.
Step 16
- Repeat the previous step for the 4L strip.
Step 17
- Reconnect the display power and data cables for the final time.
Step 18
- Steady the display with one hand as you remove the adhesive liners in the following steps, or rest it lightly against the iMac's enclosure.
Step 19
- Remove the protective film from Strip 1 by pulling its tab straight up.
- Likewise, remove the protective film from the strip that was paired with Strip 1.
- Repeat the previous two steps to remove the protective film from all the remaining adhesive strip pairs (labeled 2, 3, and 5).
Step 20
- Remove the tape securing the display to the rear enclosure.
Product information
Technical Details
Additional Information
| ASIN | B07FTL7QSD |
|---|---|
| Customer Reviews |
4.1 out of 5 stars |
| ═°Ăě║┌┴¤ Rank | 36,738 in Computers & Accessories (See Top 100 in Computers & Accessories) 28 in Laptop & Netbook Computer Replacement Screens |
| Date First Available | 24 July 2018 |
Feedback
Looking for specific info?
From the brand

-
Why MMOBIEL?
Make your technical fix or DIY-project as easy as possible, this is our top priority! We provide you with the best possible tools, spare parts and accessories. Our team is focused on adapting on the latest technological developments, to offer high quality products. For this reason, over 100.000 happy customers found their way to MMOBIEL.
What can you buy at MMOBIEL?
We offer more than 2500 high quality tools and accessories for categories such as: smartphone, tablet, computer, drone, smartwatch, 3D-printer or other DIY projects.
-

-
View our products
-
View our products
-

Our ambitious and diverse team is working from all over the world. With over 10 years of experience, we offer you the best possible products and services.
At MMOBIEL, we believe that whether it is fixing your phone, console or watch; you can do it yourself for low costs. And the great thing is: by fixing your device you will not only extend its life-cycle, but also help the environment!


